Almond Butter & Coconut Stuffed Cinnamon Swirl French Toast with Caramel Banana Sauce

November 9th, 2014

Tasty almond butter and coconut sandwiches dipped in batter and seared on a hot griddle! The banana sauce finishes them perfectly.

  • 1 loaf cinnamon swirl bread
  • almond butter
  • coconut
  • 3 eggs
  • maple syrup
  • plain yogurt (whole milk preferred)
  • spices (cinnamon, ginger, cardamom, nutmeg, etc.)
  • 2 Tbl butter
  • 2 frozen bananas
  • brown sugar
  • water
  1. Slice bread and keep ordered as if for sandwiches.
  2. Make almond butter and coconut sandwiches, spreading each piece of bread with a thin layer of the almond butter and sprinkling with coconut.
  3. Make the batter for the french toast with eggs, yogurt, maple syrup and spices.
  4. Meanwhile, make the sauce: heat a small saute pan over medium-high heat.  Melt the butter, add some spices.  Sear the bananas on both sides.  Sprinkle with brown sugar and beat with a wooden spoon to pulverize the bananas and combine with the sugar.  Let the sugar caramelize until the bubbles are thick, then stir in water with wooden spoon as necessary to regulate the consistency.
  5. Batter the almond butter & coconut sandwiches in the egg-yogurt mixture and cook on a hot griddle in butter or oil.
  6. Finish the french toast in a 350 degree oven for about 8 minutes to make sure that they are hot all the way through.

Serve one stuffed french toast sandwich with banana caramel sauce per person.  Delicious!

FSMA and the Small Farmer

October 22nd, 2013

I haven’t written much lately.  So I hope a few people swing by this page and see this before November 15.  I thought you might be interested in a couple of views on proposed farming rules and how they will affect small farms in our region.

The Food Safety Modernization Act (FSMA) was drafted to update food safety rules that have been on the books virtually unchanged since the aftermath of Upton Sinclair’s The Jungle.  In many cases, there is good cause for an update of the rules: especially in light of the mechanization of many aspects of the mainstream food system.  The difficulty comes when small, local farmers are lumped in with megagricultural behemoths and when the proposed rules push small farms toward disposability and less sustainable processes.

The first link comes from Don Kretschmann, who operates a small farm in Rochester, PA.  I personally get my CSA share from his farm; have visited his operation; and know the care and attention he puts into all aspects of his operation–and the emphasis that he puts on finding sustainable, reusable solutions for everyday problems.  He and I share a belief that the disposable solution, while perhaps the easiest to implement, is perhaps the worst in the long haul as it creates a great deal of waste and requires a great deal of energy to implement.  Here’s the link to his thoroughly researched views on what some of the proposed rules could mean for his farm: http://www.kretschmannfarm.com/all-hands-on-deck-your-fresh-food-supply-our-farm-is-in-danger.

The second link comes from Brian Snyder, who is Executive Director of the Pennsylvania Association for Sustainable Agriculture.  I do not know him personally, but PASA is a fantastic organization that has done a lot to promote local food for local people.  It was through their resources that, shortly after I moved to Pittsburgh, I discovered both regional farms and restaurants procuring and preparing local produce.  Brian is also immersed in the world of small farming and has a great deal of insight about the potential for drastic and detrimental effects on small farms should the proposed rules go through as written.  Here is a link to his essay on the topic: http://writetofarm.com/2013/10/14/fdas-culture-of-fear-threatens-food-safety/.

I plan on submitting public comments on the proposed rules: not just because I am well educated in issues related to food safety and because I believe strongly in the value of locally raised produce for my family: but because I know the benefit of locally raised produce for all of the families served by Greater Pittsburgh Community Food Bank.  GPCFB receives locally raised produce from many regional farms.  We glean their fields and receive donations of food that they harvest themselves.  They are our most important partners because they grow food.  As the bumper sticker goes, “Know Farmers, Know Food; No Farmers, No Food.”

Please consider the opinions presented by these two well-educated individuals; and then consider submitting comments on the proposed FSMA rules to help protect locally grown food for everyone.  Click here to visit PASA’s FSMA Action Center for more info on the proposed rules and how to submit your comments.

Boyden Valley Winery

July 21st, 2013

Aurora and I just finished a wine and cheese tour of Vermont. Okay, so it was mostly cheese (it turns out while Vermont has the world’s best cheddar, it also boasts several other lovely cheeses as well). But, we did get to sample several lovely wines, most notably from Boyden Valley Winery in Cambridge, VT.

Boyden Valley Winery had several nice wines and one excellent liqueur. Their Maple Cream Liqueur was absolutely outstanding: Apple Brandy serves as the base. It is sweetened with maple syrup and made rich with cream. If you enjoy Irish Cream you will definitely love this. If you also cherish pure maple syrup as the superlative sweetener, you will venerate this concoction. It is delicious. And, as it turns out, this liqueur will be available through the PA Liquor Control Board soon.  I highly recommend purchasing it.

If you happen to be in Cambridge, $7 gets you 6 samples and a wine glass. Here are some notes from my tasting of some of Boyden Valley’s other products:

  • Riverbend Red: Peppery. Lovely and rich at the front of the tongue with a gentle glide through to the aftertaste. Quite enjoyable.
  • Big Barn Red: Fatter through the front of the tongue but rears up in the back. Good.
  • Rhubarb: Hmmm… I didn’t expect to like a fruit wine. Not really too sweet, though. Nice and tart.
  • Vermont Maple Apple Wine: 6 months in stainless. Dry maple flavor. Wonder what it would taste like aged in maple cooperage instead of stainless?
  • Gold Leaf Cider: Northern Spy apples. Sweet, rises toward the back of the tongue.
  • Vermont Ice Cider: McIntosh, Empire, Northern Spy. Balanced wave across the tongue, finishes with a sweetness in the front of the mouth.

Notes on a Lasagna

June 10th, 2013

I’ve written before about how I annotate my recipes so that I can go back later and know what I did–make adjustments based on past shortcomings; or remember how to repeat past successes.  When it comes to lasagna, though, I don;t really have a recipe to annotate… so I figure I’ll just make my notes here and unless the internets fail, I should be able to dig this up when I need it.

The Noodles

I used De Cecco brand noodles.  i liked their size: they were short enough that they were easy to work with and fit comfortably in a 10 x 15 pan (several shingled widthwise and then two placed end to end lengthwise to fill in the gap on the side).

The box reports that if boiling, to cook them 4 minutes and then bake for 20 minutes in the pan.  I think about 6 minutes is a better timeline for the boiling.

The noodles had a tendency t stick together.  Pulling them from the hot water with tongs individually seemed to help, but it was important to get them out of e pan individually.  It seemed the best way to get this done was to stack them crosswise in the water, two abreast in each layer.  Wait a reasonable interval between adding the next layer (several seconds) and then to invert the stack so that they first ones dropped into the water were also the first to be pulled out.

I transferred them into a bowl of cold water for holding.  This worked well, but if they were stuck together when entering the cold water, they never came unstuck, so make sure to get them unstuck while still in the boiling water!

One pound of noodles seems about perfect for a 3-layer, 10 x 15 lasagna, assuming that you can get them all pulled out without being stuck together.  I had lots of leftover noodles from cooking two pounds….

The filling

6 crimini mushrooms short of a full Wild Purveyors CSA box.

I sauteed the shiitake first, then the royal trumpet, and finally the crimini, transferring each type of mushroom out of the pan after they were done to golden brown and caramelized.

I salted each batch of mushrooms individually–which was perhaps a mistake.  I probably should have used less salt.  The mushrooms wuld have been great as a side dish, but when stacked atop each other with all of the other components of the filling, it was a bit salty.

One onion, diced to small dice, caramelized.  When starting to turn golden brown, 2 heads of garlic, sliced thinly (about 20 cloves).  Cook until all is golden brown and beautiful.  Add frozen spinach.  When it’s thawed, mix the mushrooms into it.

2 blocks of frozen chopped spinach was about the right amount.

Ricotta/ Sauce mixture: I bought a 46-oz tub of ricotta.  This was way too much.  Probably only needed half this amount.

For the sauce of this portion: a 28-ounce can of crushed tomatoes mixed with a little brown sugar, some marjoram, some basil, some thyme, and probably a bit too much salt.  I added more after I thought I had enough because I have a tendency to undersalt when making sauce from canned tomatoes and they always wind up tasting tinny and flat.  I overcorrected this time and should watch it on the next go-round.

Cheese:

3 x 8-ounce packets of mozarella.  Freshly grated parmesan.

Layering:

Rubbed the pan with butter to avoid sticking.  Thin layer of sauce (Ragu, large bottle–just shy of being the perfect amount).  Noodles, ricotta-sauce mix, spinach-mushroom mix, mozarella, tomato sauce, noodle, etc.  Add the parmesan to the very top.

Bake 375 for about 30 minutes.

Results: over-salted, but otherwise, quite satisfying.

Derby Day Tip

May 4th, 2013

Try making your julep with pure maple syrup instead of simple syrup for a real treat!

Maple Mint Julep

  • A few mint leaves
  • 2 tsp pure maple syrup
  • 2 tsp water
  • crushed ice (see below for crushing tip)
  • 1 jigger bourbon
  1. Muddle mint leaves in bottom of glass.
  2. Add maple syrup and water.
  3. Top with crushed ice.  To crush, put cubes in clean kitchen towel and crush by leaning on them with a heavy iron skillet.
  4. Top with bourbon, stir, garnish with a mint sprig, and serve.

Beef Cuts

April 8th, 2013

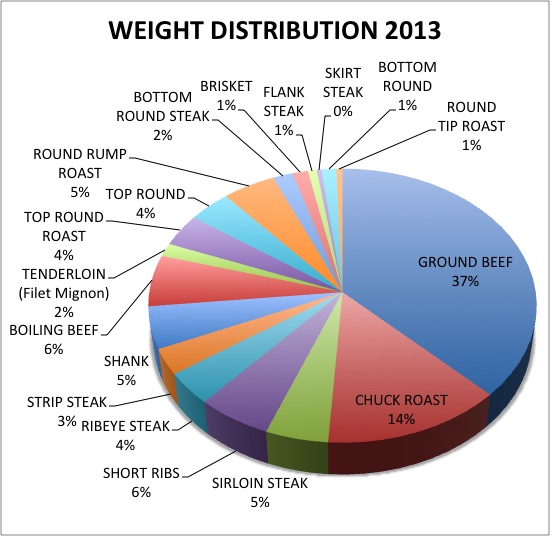
A beef steer can be processed in many ways—the least processed option would be as 2 sides of beef; the most processed would probably be to grind the whole darned thing.  When I organize my beef draft, I provide instructions to the slaughterhouse that are intended to make the cuts as consumer-friendly as possible and to provide as wide a range of cuts as I can get.

So what’s on a beef steer?  Here’s a quick look at the percent by weight of each cut that I get based on the cutting instructions I provide:

So what to do with these cuts?

Grilling/ Dry Roasting:

These are some of the easier cuts to handle!  Season with salt and pepper or your favorite spice rub and have at it!

  • Tenderloin
  • Strip Steak
  • Ribeye
  • Sirloin Steak (center cut/ boneless)
  • Top Round/ Round Tip (cook no more than medium rare and slice thinly)
  • Top Round Roast (cook no more than medium rare and slice thinly)
Broiling
Intense heat will sear the outside while leaving the interior nice and rare.  This is best used for thin cuts.  It’s also a good idea to marinate these cuts before broiling
  • Skirt Steak
  • Flank Steak
Chicken Frying
There’s nothing like a good chicken fried steak.  Don’t feel like going to the truck stop?  You can make it at home.
  • Bottom Round Steak (place meat between 2 sheets of plastic wrap and pound the bejeezus out of it with a tenderizing hammer before breading and frying)
Braising
Long, slow, moist heat will help the collagen in the tougher, more exercised muscles to liquefy, making these cuts tender and flavorful when done right!
  • Chuck Roast
  • Rump Roast
  • Bottom Round Steak
  • Boiling Beef (braise, cool, separate meat from bones and fat, reheat in sauce for best service!)
  • Short Ribs (braise, cool, separate meat from bones and fat, reheat in sauce for best service!)
  • Shank (think osso bucco!)
  • Brisket (if you’re feeling ambitious, this is the cut typically turned into corned beef!)

Fastest Carrot Peeler in the Land

April 1st, 2013

6 carrots… 51 seconds… Find out how:

Advice for the Newly Lactose Intolerant

March 15th, 2013

Dear Jesse,

I’m a cheese lover - in fact my entire food budget is arguably structured around how much money I can legitimately spend on new and interesting cheeses. Unfortunately I seem to be suddenly developing symptoms of lactose intolerence- and this at age twenty! While a medical diagnosis is still in the pipeline I was wondering if you’d ever heard of this happening before? Also, if the worst should happen, do you have any tips? I’m happy to switch to soy for my three-cups-of-tea-a-day lifestyle but I’m not exactly how to restructure my cooking if I have to knock out butter, cream, milk and my beloved cheese.

That’s pretty lousy. I know I would be devastated if I lost cheese from my diet.

As an initial disclaimer, it is worth noting that I hold degrees in neither nutrition nor medicine.

That having been said, I am pleased to tell you that if your problems do indeed stem from a lactose intolerance, there is, to my knowledge, a very good chance that you will still be able to enjoy sheep’s milk, goat’s milk, and hard aged cheeses without issue.

The form of lactose in cow’s milk is apparently not the same as is found in other species’ milk; and the aging process winds up transforming lactose chemically.

Unfortunately, that will not help you, for instance, to comfortably enjoy the sharp tang of a 5-year-old vermont white cheddar, but you can be consoled by the likelihood that a French sheep’s milk roquefort still may fit into your digestive capabilities.

With regards to cooking:

♦ I noticed that my fairly run of the mill grocery store stocks canned condensed goat’s milk and also powdered dry goat’s milk. The East End Food Coop (if you live in Pittsburgh) stocks fresh goat’s milk. You may be able to switch to this as an alternative for baking and creamy soups, etc.
♦ Sheep’s milk or goat’s milk yogurt can help substitute for sour cream or, potentially, even cream for baked goods (this may require some experimentation).
♦ I would suggest a switch to lard and coconut oil for a replacement to butter when you need a harder fat (like in a pie crust or for high temp cooking). Coconut oil, for instance, would likely work well for making a streusel topping or making a muffin or biscuit with luxurious mouthfeel. Lard (and other animal fats) are fantastic for sauteeing or roasting vegetables (mushrooms cooked in pig fat are delicious!)
♦ For other purposes, try stocking a wide range of oils and experimenting with their use. A nice olive oil (especially when seasoned by sauteeing some garlic in it) makes a nice dip for a hunk of good bread; grapeseed and walnut oil are both good for many cooking purposes.
♦ These substitutions will definitely impact your bottom line when it comes to grocery shopping. They all tend to be more expensive than butter. Check TJMaxx for cheap, high quality specialty oils; or your local Italian specialty shop for bulk olive oil (Penn Mac is a great choice in Pittsburgh, you can refill your jug each time you go back from their bulk section).

Best of luck!

Jesse

Sustainable Farm Production

January 15th, 2013

I highly encourage you to take 6 minutes out of your day to watch this video about the myths surrounding the need for more agri-business to meet our future food needs.  It is well-produced, well-researched, and offers citations for its figures (though you have to follow a separate link to get to them).

Food Myth Busters: Agriculture to Feed the World

Turkey Stew Polenta

December 1st, 2012

Believe it or not, I’m still reheating Thanksgiving…

Leftover leftovers:
Turkey Polenta Cakes, served with salsa and guacamole

Turkey Polenta Cakes

A decidedly American take on the classic Italian dish

  • 1 cup onion, cut in 1/4-inch dice
  • 6 cloves garlic, sliced thinly
  • 2 cups sliced mushrooms, mixed varieties
  • 2 carrots, shredded
  • a couple cups of leftover turkey, picked from the bones and/or cut into small pieces
  • 4 cups turkey stock, made from the carcass of your Thanksgiving bird
  • 1 cup cornmeal
  • 1 stick of unsalted butter, divided
  • salt, pepper, ginger, and crushed red pepperto taste
  1. Heat a large (#10) cast iron skillet over medium heat. Once it is hot, add about 2 Tbl butter along with some black pepper and ginger. Let the butter melt, then add your diced onion and about 1/4 tsp kosher salt.
  2. Cook the onion for about 7-8 minutes or until the onion has started to brown at the edges, stirring about once per minute.
  3. Add the garlic and cook about 2 minutes, stirring 2-3 times.
  4. Add 2 Tbl butter, let melt.
  5. Add the sliced mushrooms, along with some ginger and a touch of crushed red pepper. Cook 10-15 minutes, stirring 1-2 times per minute. Pay more attention to the mushrooms the longer they cook. We’re looking for them to caramelize nicely but not to scorch or burn.
  6. When the mushrooms look gorgeous, add the turkey stock and bring it to a boil.
  7. Once he stock is at a rolling boil, whisk the cornmeal in at a steady drizzle. Add it slowly and keep that whisk moving in order to avoid lumps!
  8. Once the cornmeal has been incorporated evenly into the stock, turn the heat down to a simmer and add the shredded carrots into the pan. Cook at low heat, stirrign occasionally, for 30-40 minutes.
  9. At this point, you’ve got a really tasty cornmeal mush. I highly recommend taking a couple bowlfuls out for a meal or a side dish for today’s meal, because the polenta has to cool overnight before it’s ready to be made into the cakes (now you get what I meant above by leftover leftovers.). Plus this mush is delicious—it’s like turkey stew and biscuits all in one steaming bowl of goodness!
  10. Let the rest of the polenta cool or 20-30 minutes, then use a piece of parchment paper large enough to cover the entire pan to press it down to uniform depth.
  11. Let it cool a while longer to room temperature, then run a rubber spatula around the edge of the pan and invert the pan onto a clean countertop (with the parchment still in place). The polenta should drop out of the pan onto the parchment. Wrap it up and refrigerate it overnight.
  12. Day two, cut the polenta into cakes. Heat your skillet (which you should have cleaned in the meantime) over medium heat. Add 2 Tbl butter to the pan, let it melt. Cook half of the cakes in this butter, flipping after 5-6 minutes or when golden brown and cooking the other side for another 5-6 minutes. Remove to a sheet tray in a warm (200°) oven while you cook the other half of the cakes in the other 2 Tbl of butter.
  13. Serve with salsa and guacamole or your favorite condiments.